Survey
You can collect points with the Reach Panel app using the Point collection tool. The feature allows to make project-based point collection with auto-save rules or manually and then export the data into different formats.
tip
The tool is perfect for surveying and collecting ground control points.
Creating New Project#
- Go to reach-rover with a browser or the Reach Panel mobile app
- Choose the Survey tab in the menu
- To create a new project, press New project or click on the project name to open it
Project settings#
Basic information#
In the first step, you can fill in the Project name, Author and add Comment if you want. However, you can use default settings and press the Next button.
Auto-save rules#
Auto-save rules are set for Single, Float, or Fix statuses and allow to automate the point collection process.
To configure auto-save rules:
Select the solution status at which the device will save points automatically by clicking on the checkbox
The menu with settings will open. You can use recommended default values for the required observation time, precision and DOP or set yours.
Default observation time#
Solution status Time Fix 40 sec Float 5 min Single 10 min Precision#
This parameter indicates the highest possible RMS error within the measurement. The deviation for the single solution is usually several meters. With the float solution, you may expect submeter precision. With the fix status, you can get centimeter-level precision.
DOP#
DOP stands for the dilution of precision and specifies the effect of satellite geometry on measurement precision. The better the geometry is, the lower the DOP value is. For auto-save rules default value is 2, when DOP is higher it is not recommended to collect points as bad satellite geometry might affect accuracy.
If you do not need auto-saving, you can click Done to go further. In that case, you will need to start and stop point collecting manually
Survey tool interface#
Survey tool interface shows the map with base and rover on it.
- B stands for the base station
- R stands for the rover
Antenna height setup#
- Press
 to open the Pole height menu
 - If you use thread adapter, check the box
note
Reach RS/RS+ has a 1/4" mount and requires a thread adapter, which comes in a package.
- Change the pole height in the next form if it differs from the standard 2m value
- Press the Save button
Collecting the point#
Press
 to go to the next window
You can set the point name or use the default value. If you leave the name field blank, the default point name will be “Point 1”, “Point 2”, etc.
note
You can also set the new Pole height value if it changed.
Press Collect to start point collecting process
If you set Auto-save rules, you will see the status bar indicating the time until the end of point collection. Otherwise, you need to stop collecting point by pressing the Accept button.
danger
If the Collect button is unavailable and you see the message “Waiting for solution status”, you will not be able to start point collection. Check the solution status.
You can stop the process by pressing the Cancel button. In that case, the point will not be saved.
- If you want to end surveying or look at the result, press the Back button. You will see the map with all the points you have collected
Point options#
To open the list of all points, press ![]() . You can open point details, edit the point info, find it on the map or stake out the point.
Read more about Stake out function in our guide.
. You can open point details, edit the point info, find it on the map or stake out the point.
Read more about Stake out function in our guide.
Also, you can work with each point separately by choosing it on the map.
When the surveying is done, press ![]() to close and save the project. It will be available in the Survey tab menu.
to close and save the project. It will be available in the Survey tab menu.
Exporting Data#
When you finish collecting points, you can export your project in CSV, DXF, GeoJSON, DroneDeploy CSV, or ESRI Shapefiles format.
To do it, press •••, click Export and choose the right format. The downloading will start automatically. Large projects might take some time to process. After that, you can find your archive in the default Downloads folder.
note
If you use Reach Panel app on Android, exporting will be made in a Downloads folder. As for iOS, you will need to choose the way you want to save your project.

It is also possible to export your project in the Survey tab without opening it. Click the Export button in the project window and choose the format as in a previous way.
Point stakeout#
Point stakeout is a feature that allows finding points with known coordinates.
Preparing data#
Open the Survey tab in Reach Panel.

If there is an existing project, click to the project name to open it
If you do not have any projects or want to create a new one, check the Creating New Project section of this article
You can use coordinates collected earlier or just upload a list with required points.
Points import#
Hit ••• button on the right side of the project name and choose Import in the drop-down list.
You can upload files in CSV, GeoJSON, or DXF formats or just enter coordinates manually.
note
Check the templates to find out what exactly your data should look like.
CSV template
GeoJSON template
After you finish adding coordinates, hit the Import button.
Interface#
Tap the point you want to stake out. It will be highlighted in blue. At the bottom of the screen, you will see a point description that includes the name of the point, point collection UTC date and time, and solution status.
Hit the Stake out button to start.
Let’s get in touch with the Stake out interface before proceeding.
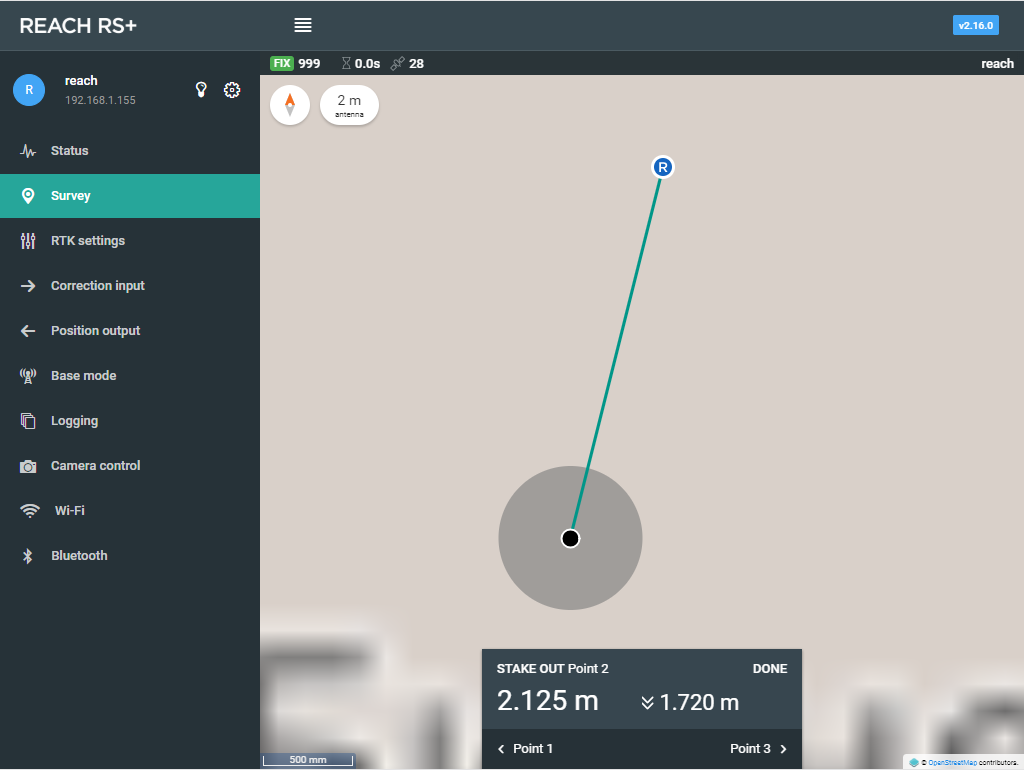
- You can see solution status, AR ratio, age of differential, satellite number, and Reach name in the status bar placed in the top of the page. Make sure you have Fix
- The antenna height value can be found under the status bar
- In this mode, the map is always oriented north
- There is a dark-gray field at the bottom of the window. The left value is the horizontal distance to the point, the right value is vertical
- The Done button finishes the stakeout
- There are other points you can switch to under the distance values
Staking out points#
Try to move in the direction to the point. The map zooms in automatically.
"How to understand in which direction the point is?"
Once start walking, you will see the rover symbol changes to the arrow.
When the distance to the point is less than 50 centimeters (1.64 feet), stakeout changes the mode.
You need to put a blue rover circle into the white ring by moving the pole. Ensure the pole is not tilted. Does rover circle become green? Good job! We have almost finished.
Here you can also choose the 2D or 3D option. 2D stands for latitude and longitude coordinates only. With 3D, you can also find the height of the point.
Congratulations! You have just staked out your first point! Now you can switch to another point to continue or hit the Done button to finish.
To-Dos#
The Survey tool is constantly improving. Many features including new export formats, new project settings are coming soon. The discussion, including questions and feature request, is available on the community forum.